Marketing your business on Twitter and other social media platforms can be intimidating if you haven’t yet done it. According to Social Media Examiner’s 2016 Social Media Marketing Industry Report, 50% of marketers feel that social media marketing had become more difficult in the last 12 months. Many small business owners indicate a lack of understanding, time and other key resources as reasons for not engaging their business in social media. There are many compelling reasons for a business to enter the social media arena. Many are seeing the value and effectiveness in social media marketing. As an example, here is a list of 10 Benefits of Social Media for Business from industry experts at Hootsuite:
- Gain valuable customer insights
- Increase brand awareness and loyalty
- Run targeted ads with real-time results
- Generate higher converting leads
- Provide rich customer experiences
- Increase website traffic and search ranking
- Find out what your competitors are doing
- Share content faster and easier
- Geotarget content
- Build relationships
Considering the list above, would the extra time spent entering and then learning the social media landscape be worth the efforts for your business?
In our last post, we went over the steps needed to create a Facebook page for your business (How to Create a Facebook Business Account). Today, we are offering up a similar, and hopefully painless guide on how to create a Twitter account for your business. It isn’t as hard as you may think and we hope that taking these first steps will be the beginning of your business’s social media journey where you can see the reality of the above-mentioned benefits realized for you and your business.
Step 1 – Where to Start
First things first – head over to Twitter.com and click the “Sign up” button on the upper right section of the page. Note, you will first need to sign out of your personal Twitter account if you are already logged in.

You will now need to enter the name of your business, a valid email address, and a strong password. Once that is all entered click the “Sign up” button to begin customizing your new business Twitter account.
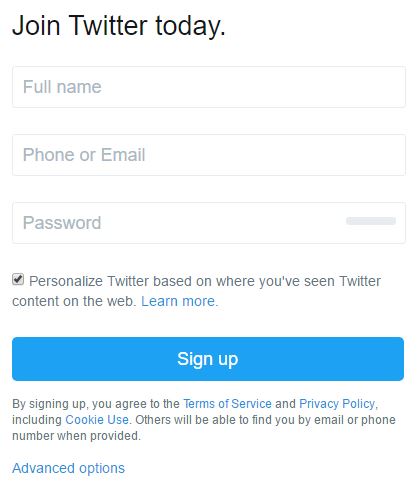
For verification purposes, you will also be asked to provide a phone number where you can receive text messages. Next, check for an email from Twitter at the email address you provided, and then click on the confirmation link within that email.
Once that is taken care of you can let Twitter know what areas interest you.
Twitter will then want to help you start following people you know by looking at your current contacts. This is optional. If you aren’t sure about or comfortable with this action you can click “No thanks,” to skip this step. There is nothing to worry about if you do decide to skip this as you can always go back and allow Twitter to access your contact lists at a later time.
Step 2 – Entering in your Details
Now that you have your account created it’s time to start building your profile.
To get into your account settings from the home page click anywhere on your profile overview in the upper left section of the page.

Next click on the “Edit profile” button on the right. You can now add or change your profile and header images, enter your company bio, location, and website address. Your Twitter profile’s theme color can also be changed here – make sure you pick a color that is in your brand standards.

Pay special attention to your company’s bio section. It should tell people viewing your profile exactly who and what your business is. It also shows up in search engine results making it easier for prospective customers to find your offerings. Be descriptive and informative here as well as stay consistent with your brand messaging.
Step 3 – Adding Images
Next you will want to add a Twitter profile picture and a Twitter header image.
Make sure the profile picture you choose is clean and easy to distinguish as a small icon. This will be the image that others will see next to your tweets.
The header image is significantly larger and can even include text such as your business’s tag line.

The recommended image sizes are:
- Header photo – 1500 x 500 pixels
- Profile photo – 400 x 400 pixels
To upload a new or updated image simply click on the camera icon in each section.
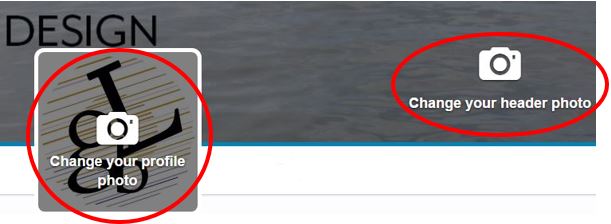
Once you have everything as you’d like it, click “Save changes” on the right side of the page.
Step 4 – More Details
To get into the rest of your Twitter account settings, click on the small image of your profile photo located on the upper right section of the page. Click on the “Settings and privacy” option at the bottom of the pop-up menu.
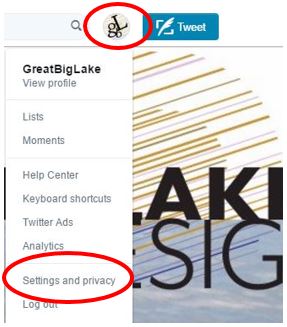
From here you can make changes to your:
- Username
- Email address
- Language
- Time zone
- Security settings
- Password
…etc.
Step 5 – It’s Time to Tweet
Now that your new business Twitter account is all setup and personalized, you can start “Tweeting.” Here are a few tips to keep in mind as you venture forward:
- Keep your messages short and to the point – your message can be no more than 140 characters long.
- Your tweets can include links to your blog posts or any other web content.
- You can include images and even short videos in your tweets to attract more attention.
- Remember to tell the story of your business to the Twitter community by letting your followers know what you can do for them and the value your products and services bring to them – keep it “them” focused and not on yourself.
Twitter is a diverse and far reaching tool that you can use to help you engage with your audience. For more tips and advice on using your new business Twitter account have a look at this great article from Social Media Examiner. Also, stay tuned here for more social media guides and articles meant to help your business engage in the ever-expanding digital landscape.